Curl and Fly Tweaks: Advance Your Chest and Biceps Training
There are two reasons why people do the exercises they do (or most anything else really). Number one is that someone told them to. They picked it from some magazine’s list of chest exercises, copied it from some big guy or got told “Hey, bro, check this exercise out!”. Reason number two is that it feels right. The exercise gives a good pump, looks great in the mirror or makes you feel like a badass. This article is about reason number three, which is that the exercise provides the optimal stimulation of the target muscle(s).
Rather than rehashing my principles of exercise selection or how a muscle’s structure determines how it should be trained, I’m going to focus on the practice and application of this information. I’ve picked two exercises that should require no introduction and give you advice on how to improve them along with my preferred variation.
Exercise #1: The Barbell Biceps Curl
Among the more ‘elite’ fitness crowd, it’s cool to hate on barbell curls these days, so let me preface by saying that I do not consider barbell curls to be a bad exercise. As long as you don’t do them in the squat rack or turn them into supinated grip power cleans, they’re all right. However, all right is a far cry from optimal. For one, the barbell limits the range of motion (ROM) of the elbow joint by hitting your legs before your biceps attain a full stretch.
Secondly, the barbell forces your wrists into a level of supination that is beyond many people’s active ROM. That is, the palms of your hands are forced completely upwards throughout the entire motion while the natural inclination is to rotate them downwards slightly during the bottom half of the movement. The result is extremely high stress on the connective tissue in between the wrists and elbows. Due to the immense popularity of the exercise, however, many people suffering from intense forearm pain after performing barbell curls conclude that the cause must be some personal defect, such as a strength imbalance. I even know of cases where doctors prescribed anti-inflammatories for this because they wrongly diagnosed periostitis. Look, there is nothing funky going on here. These individuals do not have any pathology. The same thing happens in all situations where you take a joint beyond its active ROM and then apply maximum force. Guess what, the body complains.
The straightforward solution to both imperfections would seem to be using dumbbells, but once you get reasonably strong the size of the dumbbells again starts limiting the range over which you can naturally curl the weight using a supinated grip. Moreover, there’s a third problem that’s inherent to all free weights. The elbow, as a simple hinge joint (1), dictates that the weight travels up in a circular motion. As a result, the gravitational torque and the resistance curve of the exercise increase as you bring the weight up. Since the strength curve of the elbow flexors does not increase in parallel, this creates a mismatch between your strength curve and the exercise’s resistance curve. Fortunately, there’s an easy fix.
(1) I am ignoring the proximal radioulnar joint’s part of the elbow here for the sake of simplicity, because even though it shares its joint capsule with the humeral elbow joints, it is not functional at the elbow.
Optimized Variation: The Bayesian Curl
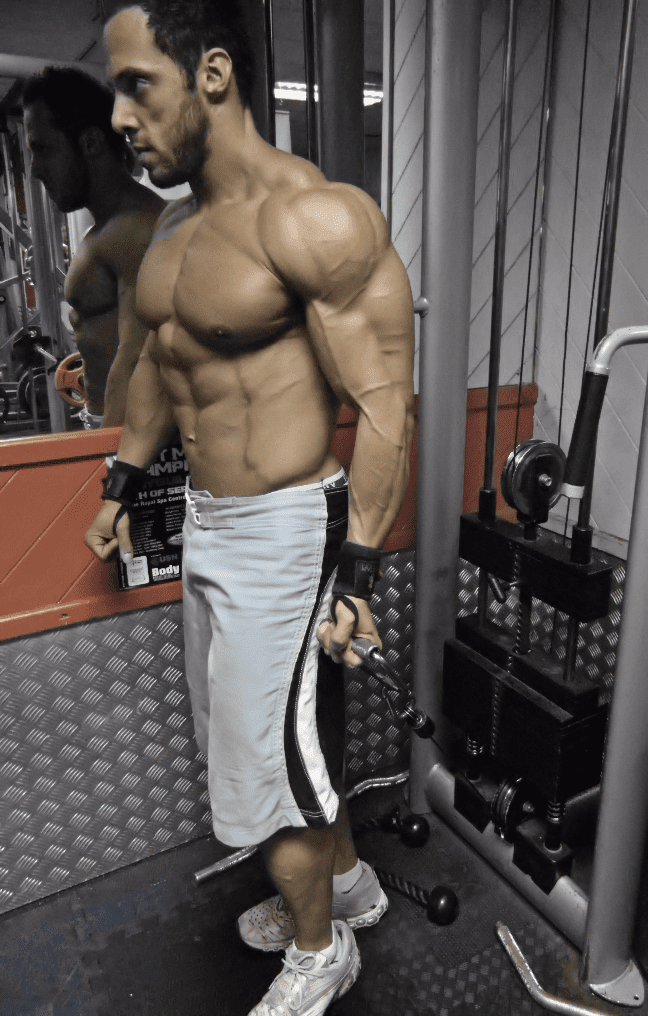
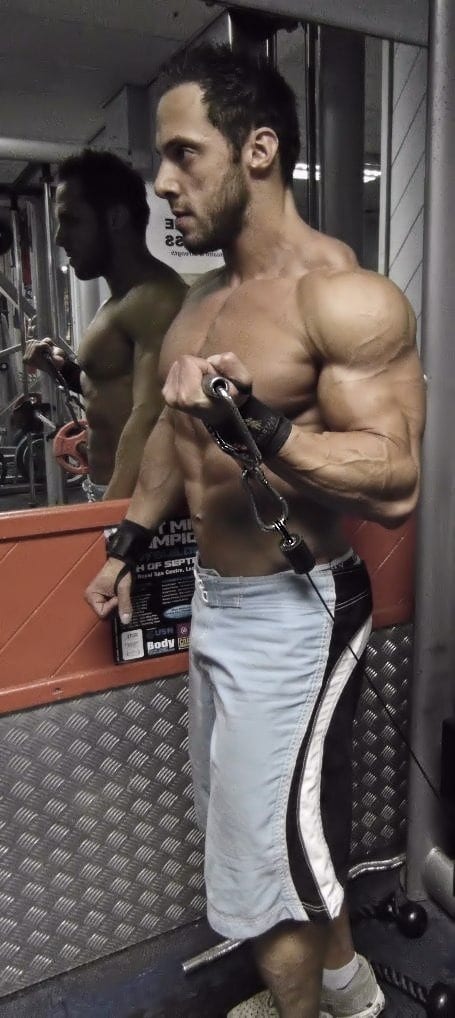
The solution is performing the ‘dumbbell curl’ with a cable. This allows you to use a supinated grip throughout the entire movement and normalizes the resistance curve. Take a look at my client Fabiano Giglio demonstrating the start and finish positions of the Bayesian Curl (video). For those unfamiliar with my methods, the term Bayesian comes from statistics and can be interpreted as a synonym of rational or a loose synonym of efficient/optimal.
Note that the starting position does not have your arm 100% extended and straight. A good rule of thumb is to let your arm get as straight as it is when you are standing in a relaxed position. That normally corresponds with the active ROM of your biceps, as further extension requires an active triceps contraction and (excessive) antagonist cocontraction is undesirable. Further elbow extension also puts unnecessary stress on the elbow’s connective tissue. Depending on your elbow flexibility, you should also allow your grip to pronate slightly, moving your palms to the floor, in the bottom half of the exercise. This should occur naturally if needed, so just focus on keeping your palms up.
From the starting position, curl the weight up. Since the short head of the biceps is also a shoulder flexor, it is natural to allow a few degrees of shoulder flexion as you curl the weight up. However, don’t let this remove the resistance at the top. Your elbow should remain close to your side.
You can further individualize the exercise by positioning yourself further or closer away from the cable pulley station to match the resistance curve to your strength curve. Stepping away from the station increases the resistance at the bottom; stepping back increases the resistance at the top. The exercise will feel weird at first if you’re accustomed to free weight curls, but over time you should be able to find a way to do the exercise that matches your body’s natural movement pattern and provides great biceps stimulation during the entire exercise.
Exercise #2: The Dumbbell Chest Fly
Arnold loved them and really, who doesn’t like chest isolation work? Pumped pecs are like nature’s own breastplate armor. The dumbbell chest fly, however, is not the ideal tool to create that armor. For one, the pectoralis major is biomechanically disadvantaged when the shoulder is externally rotated as during a regular fly, because the muscle fibers of the chest do not have a direct line of pull in that position.
This would have been easy to remedy by rotating your hands 90 degrees forwards thereby internally rotating the shoulder if there hadn’t been a second problem with the dumbbell fly. That problem is the same strength-resistance mismatch we encountered during dumbbell curls. In the bottom of a fly, the resistance reaches its maximum whereas at the top there is practically no resistance at all. What makes this problem extra problematic is that your shoulder is extra susceptible to injury when the elbow travels behind the torso and when the shoulder is internally rotated. Combining the two during a movement that has its maximum resistance in that position is truly the perfect recipe for a shoulder injury.
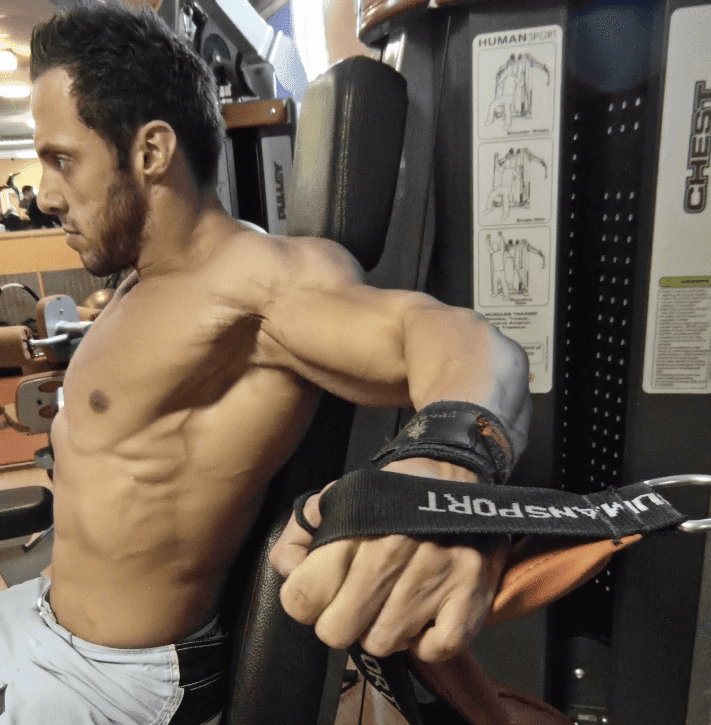
So how do we get full chest stimulation without wrecking our shoulders? First, we use cables again and secondly, we perform the movement against a bench. By having your back against a bench, you not only create extra stability and minimize unwanted body momentum and other cheating, you also have something to securely plant your shoulder blades into. Scapular retraction increases the internal room your shoulder has to function and avoid impingement by increasing subacromial space width by up to threefold. The same is true for arching your upper back or extending your thoracic spine. Powerlifters have long recognized the value of an arched back and retracted shoulder blades to protect their shoulders during heavy bench pressing, but few people have realized the same holds true for the fly.
As if these aren’t enough reasons, scapular retraction also improves activation of the pectorals by preventing active insufficiency near full contraction. The case could be made that it also results in passive insufficiency in the stretched position, but you really don’t want to let the weight drag your elbows that far beyond your active ROM anyway.
Optimized Variation: The Bayesian Fly
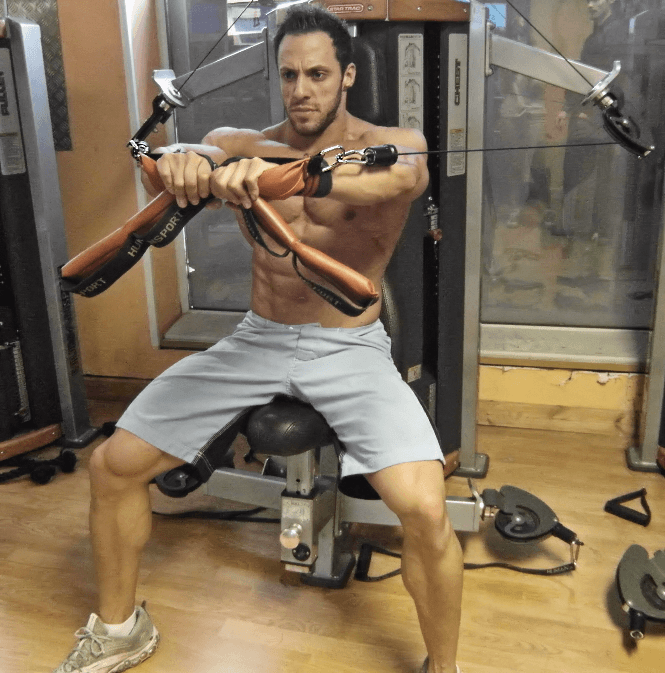
The pictures below demonstrate how the above comes together in my preferred variation of the fly exercise: the Bayesian fly (video).
If your gym doesn’t have the luxury of the depicted cable fly machine, you can simply do the exercise lying on a bench in between two low cable pulley stations. You won’t be able to look at that breastplate in the making, but I’m sure you’ll survive a minute without a mirror.
For those with injury prone shoulders, thoracic extension and scapular retraction may not be enough to guarantee safety. If that’s the case for you, first try lowering your arms in the stretched position. Bring your arms up to the same contracted end position but let them return to up to 45 degrees below the shoulder. Alternatively, limit the end ROM by not letting your elbows travel too far behind your torso. Both measures reduce chest stimulation though, so I advise using a combination of the two that’s just enough to be safe. Most people only need to lower their arms to about 15 degrees below their shoulder and can let them drift back to about a 90 percent chest stretch.
Oh and one more thing. The number one complaint I get – actually it’s the only complaint because most people experience love at first sight when trying the Bayesian fly – is that their gym doesn’t have a cable attachment that allows to be gripped with internally rotated shoulders, like a straight handle, short rope or (ankle) strap. If you can’t improvise in any way, you can always grip the hooks. I’ve had a client with a broken hand do this exercise by tying a strap to his wrist, so no excuses!
Conclusion
The chest fly and the biceps curl are possibly the most popular isolation exercises in existence. With some simple tweaks, they can be made into exercises that deserve this level of popularity. Try them out for yourself and let me know what you think. Just remember, even if you don’t like them, your biceps and chest surely do.
 Want more content like this?
Then get our free mini-course on muscle building, fat loss and strength.
By filling in your details you consent with our privacy policy and the way we handle your personal data.


